
Are you seeking to build your own Display Network Campaign? Then you must know that there are different advertising options that you can choose from but with Google Ads it’s awesome. Because Google Ads lets you reach 90% of internet users globally as well as it offers influential methods for different advertisers with their different advertising objectives like branding and awareness or sales and conversion goals. You can also use display campaign to target your audience. These amazing features make Google Ads potentially beneficial for advertisers.
So, here is an enlightening article which will aid you to set up your display campaign as well as will give you further understandings to optimize your campaign. It is very important for any PPC Outsourcing Company to do a thorough study before building a successful display campaign. Now, let’s discuss how to set up your display campaign? What are the targeting features? And what are formats available that can be used in Google display network campaign?
Setting up a Display Campaign
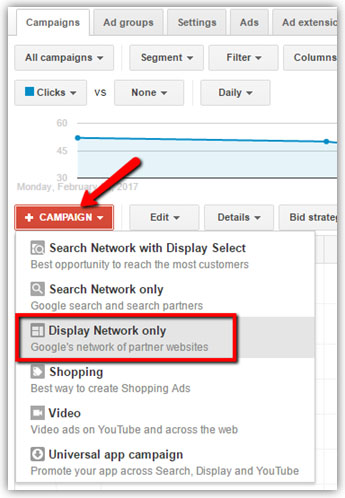
• First of all, Sign in to your Google Ads Account.
• Click the “+ CAMPAIGN” button and Select “Display Network Only”.
• Then, give a name to your campaign.
• Now, choose “Marketing Objectives” if you have done market research. If you are a new user, you can go for “No Marketing Objective” to customize your ads according to your business goals.
When you choose “No Marketing Objective” option, you’ll be able to see all the features and options available for the GDN campaign, this will help you to decide the setting for your campaign.

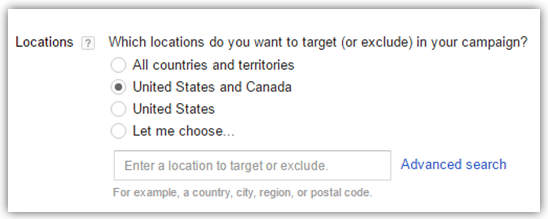
• Enter the “Locations”, where you want your ads to be exposed. Besides, you can also use exclude option to exclude the locations where you don’t want your ads to be exposed. For further understandings you can refer “Complete Guide to Google Ads Geo - Targeting”.
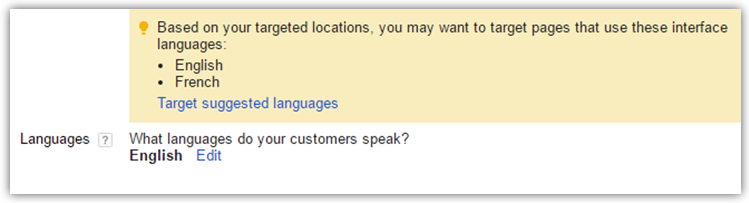
• Next is choosing the “Language” to target your audience. If you ask which would be better? I would suggest you to choose English as it is universal language and used universally.
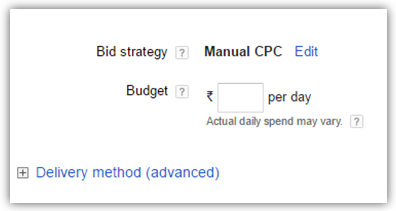
• After setting language and location targeting you will have to decide the “Budget” for your campaign that you are comfortable with.
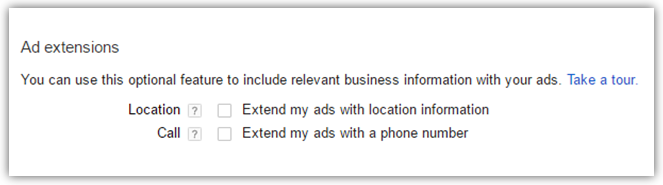
• Next we come to Ad Extension, there are two options available for ad extensions one is Location extension and other is Call extension. You can use these extensions to extend your ads with more information.
• And then finally we come to “Advanced Settings”, you don’t have to get scared of this “advanced” word. It’s quite easy and simple to adjust. I have described each of them one by one -
Ad Scheduling : You can schedule your campaign ads according to your requirements.
Ad Delivery : This option lets you determine how frequently you want Google to use your budget throughout the day.
Device Targeting : This option lets you target by device type, specific device and even by device connection type of your audience.

Furthermore, it’s all about investigating and testing with advanced settings once you gain little experience with Google Ads.
• Click on “Save and continue” button to proceed.
• When you’ll click to Save and continue, it will take you to the page shown below. Now, give a descriptive name to your Ad group and set your CPC bid. CPC (Cost-per-click) is the cost that you’ll be paying per click for your ad.
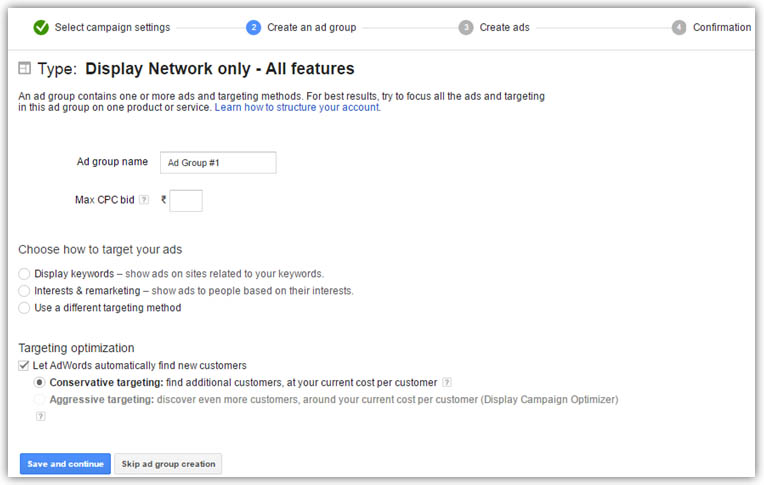
• Coming to the next, we have option how to target your ads. There are three option available for you, which I’ve explained below in details:
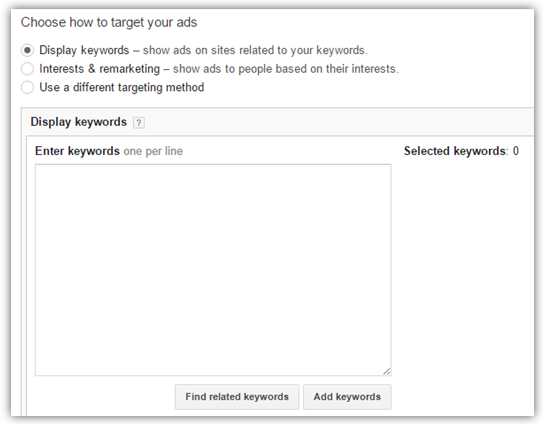
Display keywords
This option lets you add keywords relevant to your product and services to reach your best customers. Which helps you to find betrothed customers who are interested in your products and services. Later, you can also add additional keywords that are performing well for your campaign by doing campaign analysis.
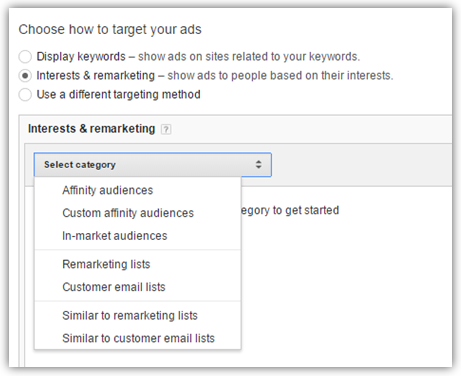
Interests & remarketing
This option lets you target audience based on their interest which you can see in dropdown menu.
With Interest category, you can target the audience according to their common interest behaviour like, music or sports etc. and thus highly relevant ads are shown to the audience.
Remarketing is quite simple, your ads are shown to the visitors who have already visited your website. It helps you to drive back customers to your website, who left without making the intended action.
Use a different targeting method: Again, here we have three options available for targeting
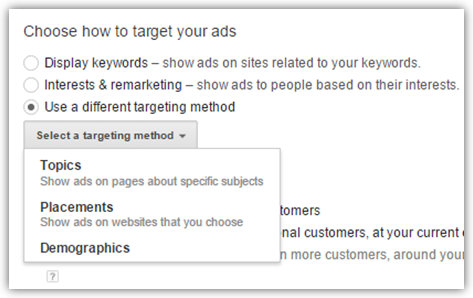
Topics
Topic targeting is much similar to interest category, which lets you show your ads on website on particular subject like Fashion websites, Sports websites etc. With topic targeting you can easily show your ads on several relevant websites.
Placements
This option lets you find the website relevant to your ads, where you can set your ads to be displayed. Just enter a word, phrase, or website and you can find the relevant websites.
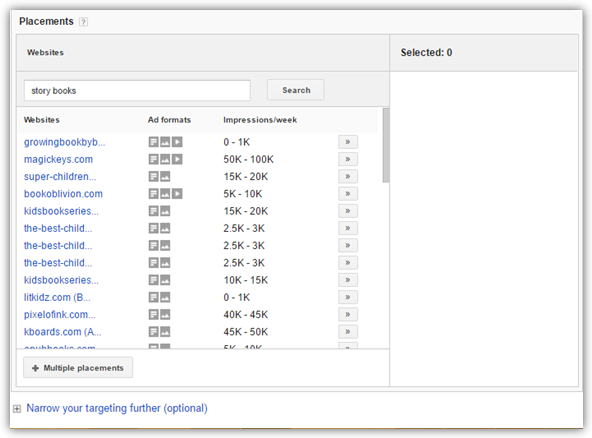
Furthermore, you can also choose specific websites or web page where you want your ads to be exposed. Click on “+ Multiple placements” to do so.
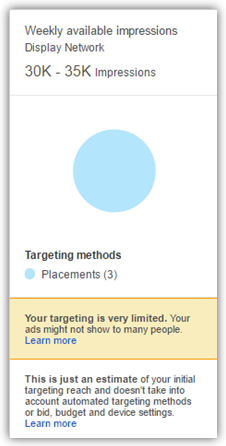
After selecting targeting for ads, you’ll be able to see weekly available impressions. Basically, this lets you know the amount of advertising space that is available on Google.
Demographics
This option lets you target by specifying Gender, Age and Parental Status. Thus, with Google Ads you can target your audience in a more precise way and can focus your budget only on the relevant customers.
For example: If the product you provide is not useful for females, then you can exclude females from gender.
• Click on “Save and continue” button for next step.
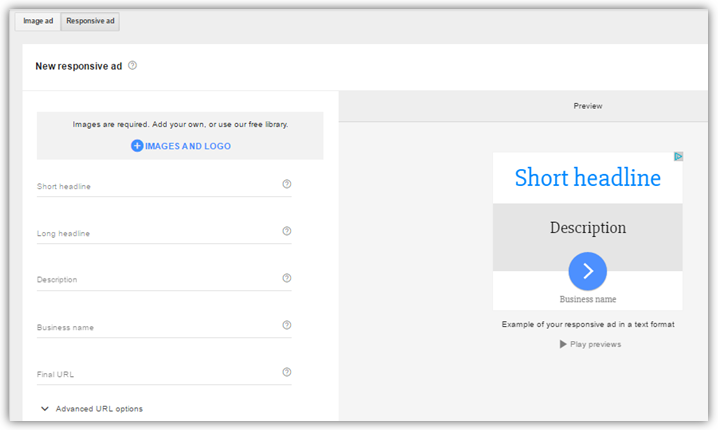
• Now, it’s time to show your creativity on “ads”. You can either create image ad or responsive ad. You can also “view ad ideas” by entering the page your ad will link to, thus Google also helps you in creating ads.
Let’s discuss with an example by creating a responsive ad which has been recently launched by Google. With responsive ads, advertisers have to no more create multiple images to cover different type of ad size. It automatically adjust your ad size, appearance and format to fit any ad space available. It more flexible and requires minimal set up. Thus, with responsive ads not only you save your precious time but also reach more web users with more impact.
Add the desired image and logo for your ad and then enter short headline (character limit 25 max), Long headline (character limit 90 max) and description (character limit 90 max).Also enter your business name (character limit 25 max) and final url.
• After creating ad you can preview your ads before submitting it.
• Click “Save” button and your display campaign will be created.
Final words
I would only say that all it depends on how you set up your campaign. Rightly created campaign with right targeting and ad creation can take your company to the next level of excellence. Hence, I would suggest keep testing and optimizing your campaign with best practices. Enjoy your display campaign! At OutsourceSEM, we offer tailored PPC solutions designed to help businesses grow. From Painting PPC, Plumber PPC, Construction PPC, Electrician PPC, small business PPC, Dental PPC and much more.